DIY Hanging Rope Shelves | A Creative Handmade Decor Project
DIY Hanging Rope Shelves have emerged as one of the most popular interior design trends in 2026. This project perfectly balances the rugged beauty of natural materials with the clean lines of modern minimalism. As people look for unique ways to display their plants and books, vertical storage solutions that don’t take up floor space have become essential. Consequently, learning how to build your own shelving is a valuable skill for any homeowner. In this extensive guide, we will walk you through the process of creating a professional-looking shelf. This guide will provide the ultimate DIY Hanging Rope Shelves inspiration to transform your empty walls into a textured gallery.
1. The Aesthetic Appeal of Rope and Wood
The combination of soft rope and solid wood creates a visual contrast that is hard to beat. For a successful DIY Hanging Rope Shelves project, the choice of materials is crucial. Using reclaimed wood or thick pine planks adds warmth to a room. Consequently, the shelves become more than just storage; they become a piece of art. Therefore, you can customize the finish to match your existing furniture. Furthermore, the natural texture of jute or cotton rope adds a “boho-chic” vibe to your space. As a result, your room feels more curated and inviting.
2. Gathering Your Essential Tools and Materials
Before starting your DIY Hanging Rope Shelves, you must ensure you have the right supplies. You will need wooden planks, thick rope (jute or nylon), a power drill, and sturdy wall hooks. Consequently, having everything ready will make the building process much smoother. Therefore, measure the area where you plan to hang the shelves to determine the length of the rope needed. Furthermore, consider using a wood stain or paint to protect the timber. As a result, your handmade project will look professional and last for many years.
3. Measuring and Drilling the Planks
Precision is the key to a level and safe shelf. During the first stage of your DIY Hanging Rope Shelves build, mark four holes on each plank, one in each corner. Consequently, you ensure that the weight will be distributed evenly. Use a drill bit that is slightly larger than the diameter of your rope. Therefore, the rope can pass through without fraying but still fit snugly. Furthermore, make sure all your holes are aligned across all planks if you are making a multi-tiered system. As a result, your shelves will hang straight and look perfectly symmetrical.
4. Sanding and Finishing the Wood
A common mistake in handmade projects is skipping the finishing stage. For a high-end DIY Hanging Rope Shelves result, sand your wooden planks thoroughly. Start with a coarse grit and move to a fine grit for a smooth-to-the-touch surface. Consequently, you remove any splinters that could catch on the rope or your fingers. Therefore, apply a clear coat or a dark walnut stain to enhance the grain. Furthermore, let the wood dry completely before assembly. As a result, your finished project will have a polished, store-bought quality.
5. Choosing the Right Rope for Strength
Not all ropes are created equal for a DIY Hanging Rope Shelves project. Jute rope offers a rustic, earthy look, while cotton rope provides a cleaner, white aesthetic. Consequently, your choice should depend on the overall style of your room. However, safety is the most important factor. Therefore, ensure the rope is rated to hold the weight of the items you plan to display. Furthermore, avoid using thin twine as it may stretch over time. As a result, your shelves will remain secure and stable for your favorite decor items.
6. The Assembly Process: Knots and Tiers
Now comes the creative part of your DIY Hanging Rope Shelves. Thread the rope through the holes and tie a sturdy knot under each plank. Consequently, the knot acts as the support for the wood. For a multi-tiered look, ensure the distance between the knots is exactly the same on all four sides. Therefore, using a measuring tape during this step is essential to keep the shelves level. Furthermore, you can use decorative beads above the knots for an extra touch of style. As a result, you create a complex and beautiful hanging system.
7. Hanging the Shelves Securely on the Wall
Safety must be your top priority when installing DIY Hanging Rope Shelves. You should always use heavy-duty wall anchors or screw the hooks directly into wall studs. Consequently, you prevent the shelves from falling and causing damage. Therefore, test the weight capacity of the hooks before placing any fragile items on the wood. Furthermore, you can hang the ropes from a single hook for a “V” shape or two hooks for a parallel look. As a result, you have the flexibility to choose the style that fits your wall space best.
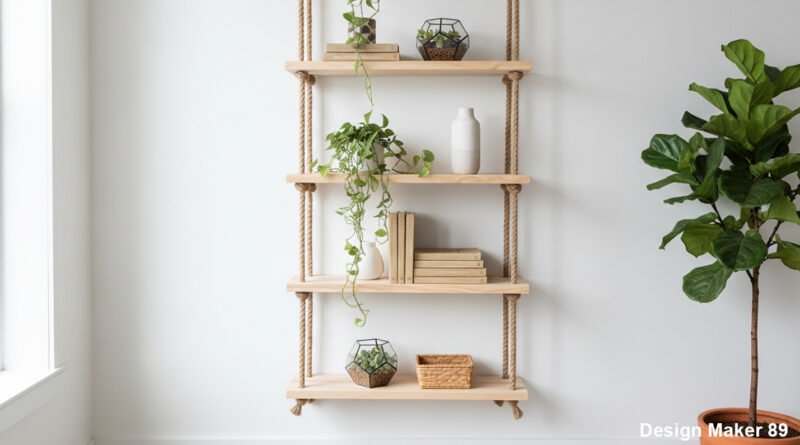
8. Styling Your New Shelves with Greenery
Once your DIY Hanging Rope Shelves are installed, it is time to style them. Because these shelves have a bit of movement, they are perfect for trailing plants like Pothos or Ivy. Consequently, the vines can grow down around the ropes, creating a “living wall” effect. Therefore, your shelves become a dynamic part of your home’s ecosystem. Furthermore, mix in a few books and small candles to add visual weight and interest. As a result, you achieve a balanced and aesthetically pleasing display.
9. Maintenance and Long-Term Care
To keep your DIY Hanging Rope Shelves looking new, minimal maintenance is required. Occasionally check the knots to ensure they have not loosened over time. Consequently, you maintain the structural integrity of the piece. Furthermore, wipe the wooden planks with a dry cloth to prevent dust buildup. Therefore, the natural beauty of the wood remains the star of the show. If you use the shelves for plants, be careful not to overwater, as moisture can damage the wood and the rope. As a result, your handmade creation will stay beautiful for a decade.
10. The Benefits of Creating Your Own Decor
Engaging in DIY Hanging Rope Shelves projects offers more than just a new piece of furniture. It provides a sense of accomplishment and a creative outlet. Consequently, you feel a deeper connection to your living space. Therefore, you are more likely to take care of and appreciate your surroundings. Furthermore, DIY projects are a great way to save money while getting exactly what you want. As a result, your home becomes a true reflection of your skills and your personal design taste.
Conclusion: Elevate Your Home with Your Own Hands
Handmade shelving is the perfect way to add personality to any room. By following this guide on DIY Hanging Rope Shelves, you can create a functional and stylish feature for your home. Remember that the beauty of DIY is in the imperfections and the unique character of the materials. Consequently, your shelves will be unlike anything anyone else has.
In conclusion, thank you for being a part of the Design Maker 89 community. We are committed to empowering you with the knowledge to build and design your dream home. Therefore, keep exploring our DIY section for more project ideas and inspiration. Let us continue to create something amazing together in 2026.
Read more about
Air Purifying Plants for Bedrooms | 10 Best Species for Better Sleep
Modern Small Space Furniture Ideas | 10 Hidden Solutions for 2026
Creative Handmade Decor Projects | 10 Unique Ideas for a Personal Touch
Vertical Gardening Solutions for Homes | 10 Creative Green Ideas